Want to create some seamless 3D objects in less time? Vase mode can help you achieve that. It's a special setting now available in some slicers, such as Ultimaker Cura. Cura is a popular free slicing software in 3D printing, offering up to hundreds of settings that can be modified. Today, we will explain how to 3D print in vase mode through Cura. But before diving into that, let's first understand what it is and how it works!
Other articles related to Cura slicer features:
- "Ironing to Smooth Top Layers"
- "How to Scale an STL File"
- "How to Use Fuzzy Skin"
- "How to Use Tree Supports"
What is Vase Mode in 3D Printing?

(Printed by 1.75mm silk PLA)
Vase mode is a special feature that prints a 3D model with a single wall, a solid bottom, and no top layer. The movement of this mode differs from that of regular mode to print. Traditionally, after finishing a layer, the print head travels through an empty space to the starting position of the next layer. However, in vase mode, the print head moves in a spiral motion to print the outer layer of the model, while the filament is continuously fed through the extruder. In Cura, this mode is referred to as 'Spiralize Outer Contour,' while in PrusaSlicer, it's known as 'Spiral Vase.'
When to Use Cura Vase Mode
Vase mode is generally suitable for objects that are thin and possess aesthetic characteristics rather than mechanical properties such as strength, toughness, hardness, or flexibility. Therefore, artistic pieces like decorative items and lampshades are particularly suited for printing using vase mode.
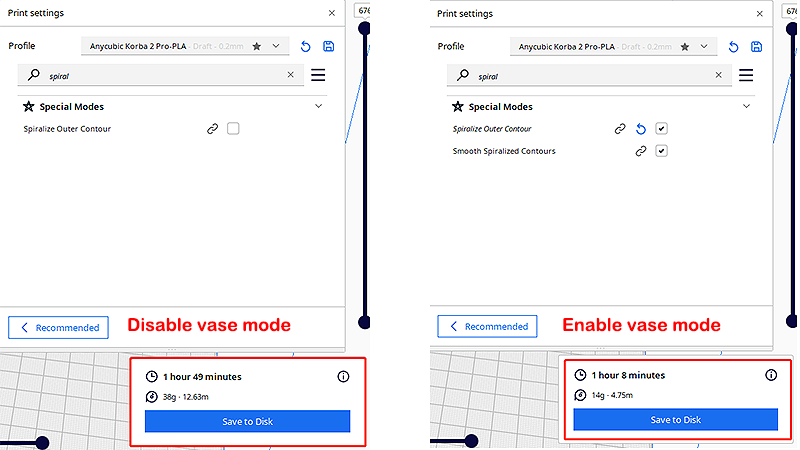
This mode allows for rapid printing, saving time and materials. We print a model with a size of 65 x 64 x 135mm and 0.2mm layer height, Anycubic Kobra 2 Pro fast printer usually takes nearly two hours and 39g of filament. However, once you activate vase mode, the Kobra 2 Pro can create the same object in approximately one hour using only 14g of material. Of course, this mode also has its disadvantages, which we have outlined below.
Pros of vase mode:
- Higher print quality: Printing along a single, continuous path eliminates Z-seam issues and achieves smooth and seamless surfaces of the printed part.
- More aesthetic appearance: It can print various aesthetically appealing art pieces, such as vases, lampshades, mugs, cups, cylinders, and many models without a top.
- Faster print times: Objects printed in vase mode involve continuous extrusion movements, saving makers time.
- Less filament usage: 3D models created in vase mode typically feature hollow interiors, no top layer, and only a single wall, requiring less material compared to other models.
Cons of vase mode:
- Fragile objects: Due to printing only the outermost wall of the model without any infill, the strength will be very low.
- Print only one print at a time: Vase mode prints are done continuously, without pauses, which can not print multiple models simultaneously.
- Geometric limitations of 3D models: Not all 3D models can be printed in vase mode; it requires models with a cylindrical structure needed, without bridges, overhangs or the need for support.
How to Turn on Vase Mode in Cura

Taking Ultimaker Cura V5.4 as an example, you can activate Cura vase mode by following this path: Print settings >> Special Modes >> Spiralize Outer Contour. Alternatively, you can directly search for keywords like 'Spiralize' in Cura's print settings to enable this feature. Make sure your model has continuous geometry before turning on this mode, and after slicing, check the compatibility of the model in the preview mode of the slicer.
How to Configure the Best Cura Vase Mode Settings
Now that you have a clear understanding of what vase mode is and how it operates. Once you activate it in Cura, it will affect other settings such as the wall line width, temperature, and speed. So it's necessary to fine-tune the print settings to achieve the best quality print results.
Wall line width: This refers to the width of each wall line. Typically, inputting a value that matches your machine's nozzle size is enough; for example, using a value of 0.4mm for a 0.4mm nozzle.
Printing temperature: In Cura vase mode, there isn't a specific temperature for printing; it depends on the filament type and printing speed you're using. If you're operating at faster speeds, you may increase the temperature to ensure the filament melts and extrudes quickly enough.
Print speed: Slowing down the speed helps get a perfect surface finish for your part, ensuring sufficient time for material cooling. It's advisable to start with the normal speed provided by the printer manufacturer. If print failures still occur, despite proper temperature settings, the solution could be reducing your printer speed until the problem improves.