FDM printers build a 3D printed object by depositing layer by layer from bottom to top, making them the most popular machines in 3D printing currently. However, machine misalignment and incorrect slicing settings often result in print failures, leading to frustration. Continuous learning and testing are essential for 3D enthusiasts to become experts.
Previously, we've discussed numerous issues concerning the first layer of prints, such as problems like 3D print warping, PLA not adhering to the bed, and elephant foot. These issues mainly arise due to poor bed adhesion. Today, we're resolving another new first-layer problem: 3D print first layer ripples. Ripples refer to rough patterns on the first layer of your print, often looking like slightly bulging waves, affecting the overall appearance. We'll explain the causes behind these ripples occurring in the first layer and provide useful solutions to fight against the issue.
Why Does My 3D Print Have Ripples and Waves?

First layer ripples in 3D printing are common printing defects characterized by roughness in the initial layer, and they appear like waves and bumps. There are several causes for these ripples occurring in the first layer, primarily due to over-extrusion and adhesion problems. Other potential factors include an uneven bed, high print speeds, and a dirty bed. When the nozzle moves, it pushes excess material that gets dragged to the sides. Then, when the material cools, it slightly curls, resulting in ripples and waves. Luckily, resolving the issue isn't difficult. If you've figured out exactly what is going on, you can go down for solutions.
Recap of the causes of 3D print ripples:
- Nozzle too close to the bed
- Over-extrusion in the first layer
- Uneven bed leveling
- Printing speed too high
- 3D printer bed is dirty
How Do I Smooth My First Layer in 3D Printing?
1. Calibrate Bed Leveling
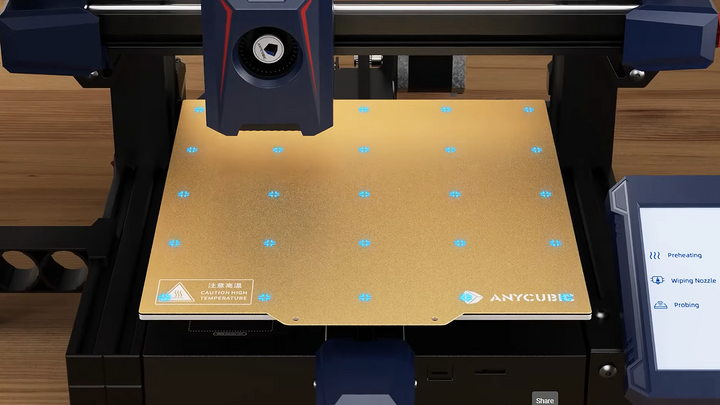
Leveling your bed and always keeping it flat and even, are crucial to achieving a high-quality first layer. If the bed is unleveled, some parts of the first layer may not stick to the bed properly, resulting in visible defects like ripples and waves. It means problems with the initial layer. At this point, you must perform bed leveling, whether manually or automatically, which is necessary. To ensure bed level correction, use a simple and quick first layer 3D print test for checking.
A printer with manual leveling is not typically recommended for beginners as their first 3D printer because it requires technical skill and experience, often leading to leveling failures. It's highly worthwhile to invest in an easy-to-use automatic bed leveling machine, such as Anycubic's Kobra 2 Neo. This model is among the top choices for entry-level printers, priced below $200, equipped with the capabilities of automatic bed leveling and high-speed printing. Its LeviQ 2.0 feature is a self-developed leveling system, following the first-generation upgrades, that offers greater precision and stability. With a maximum speed of 250mm/s, it's five times faster than many regular printers.
2. Fine-Tune Z Offset

To fine-tune the Z offset, adjust the distance between the nozzle and the bed. If this distance is too close, the nozzle may scratch the material in the first layer, resulting in ripples. Before adjusting this distance, ensure that the bed is level. Then, place a piece of paper on the print surface and lower the Z-axis until there is slight resistance when sliding the paper, indicating that the distance is fine. Finally, print a test model to check if the ripple issue has improved.
3. Adjust Flow Rate and Extruder Tension

During printing the first layer, if excessive extrusion causes the printer to push out extra filaments without enough space to place them, the print head will push the build-up of the material, then forming wavy patterns on the surfaces. Over-extruding in 3D printing can create many obvious imperfections on the surface of your parts, such as 3D print blobs and line scars. To stop 3D printing ripples from happening again, it's necessary to fix the issue of over-extrusion.
Usually, reducing excessive extruded plastic can be achieved by adjusting the extruder tension and flow rate. Signs of over-extrusion include worn marks on the strand of filament or clicking noises from the extruder. You may need to loosen the extruder tension by slightly turning the screw on the extruder, allowing the gears inside to grip the filament less tightly. Meanwhile, the flow rate is a setting parameter within the slicer software; for instance, in Cura, the default value is 100%, which is sufficient for PLA filament. You can try reducing it by 5%-10% increments to test and improve over-extrusion issues.
4. Slow Down Printer Speed

(A smooth first layer.)
Printing at too fast a speed may lead to issues such as 3D printing ripples, 3D print stringing, as well as ghosting and ringing. Generally speaking, printing at a slow speed tends to make high-quality 3D printed objects. This is because the extruded filaments have sufficient time to fuse and solidify on the bed, ensuring better adhesion of the first layer. So, how slow should it be? You can decrease the first layer speed to about 30%-50% of the normal speed, ensuring that the print head moves slowly to achieve a smooth first layer.
5. Clean 3D Printer Bed

Due to poor initial layer adhesion, printed objects might detach from the bed easily during printing. Residues like glue marks, filament remnants, and skin oils on the print bed can affect the first layer's adhesion, leading to the occurrence of ripples in the 3D print first layer. Therefore, it's crucial to keep the bed clean at all times before printing. Isopropyl alcohol and a cleaning cloth are great tools to maintain cleanliness on the bed surface and rails. Be careful not to aggressively scrape the bed surface with a sharp metal edge, as this may damage the surface coating. Routine maintenance of the printer bed is easy and cost-effective, usually involving just three simple steps. Read the article for more information on 3D printer bed maintenance.