Stepper motors are widely used in various applications, such as 3D printers, CNC machines and other devices that require precise position control. In FDM 3D printers, you can find them on the X, Y, and Z axes as they control the movement of the heated bed, print head, extruder, and so on. If your 3d printer's stepper motors not working, it will make the printer unable to function.
Before we fix the damaged motor, we should have a brief understanding of how the stepper motor operates. Inside the stepper motor, there are coils that receive electricity to make other components of the stepper motor work and provide regular rotational movement. Typically, a faulty stepper motor is caused by its inability to receive electricity. Therefore, this article shares how to use a multimeter to check and test if your stepper motor is bad.
Comparison of a Normal Motor & a Faulty Motor

We can make a primary diagnosis on the printer's stepper motor to determine if there is an issue. Attach tape or secure a zip tie around the cylindrical motor shaft that protrudes from the center of the motor. In this case, we can easily observe the motor is moving or not. Apply power to see whether the motor rotates. We will notice that the tape on the left side remains stationary while the one on the right rotates 360 degrees, indicating a potential problem with the left one. Moving forward, we need to conduct a more detailed troubleshooting process. To do so, we will require the use of a multimeter tool to test the current of the stepper motor. How to conduct a continuity test on your motor, follow the steps below.
Step 1: Set Your Multimeter

Start by setting the continuity mode, rotate the knob dial to it which is usually like a sound wave symbol or a diode symbol. Then, plug the multimeter probes by attaching the black probe to the "COM" port and the red probe to the port with a "V". To ensure the multimeter is functioning correctly, perform a probe test by touching the two multimeter probes together. You should hear a beep or see a low resistance reading on the display. It shows the probes are in good working condition.
Step 2: Perform a Continuity Test on Your Stepper Motor
Taking the motor from an Anycubic 3D printer as an example, you will find 6 signal pins located on the side of the motor. The next step is to use the multi-tester to test the pins of the motor. If the continuity test fails or you suspect an issue, it is recommended to repeat the test and confirm the results by following these steps.
Test the 1st and 3rd pins of the motor.

Place the probe leads of the multimeter on the first and third pins of the motor. If the multimeter does emit a beep, the LED lights light up, or there are readings displayed, it indicates that the signal is being properly transferred through the 1st and 3rd pins. This shows that the motor is normal.
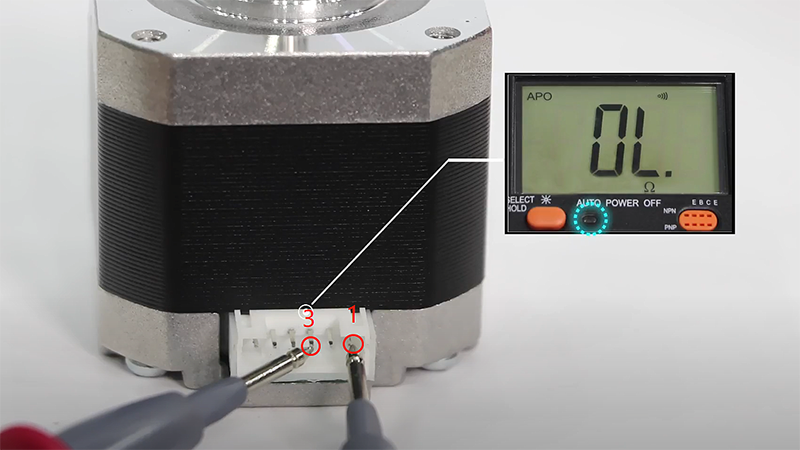
However, if there are no readings displayed on the multimeter and it shows no response, it probably means that this motor is likely damaged. You should change the old motor with a new one.
Test the 4th and 6th pins of the motor.

Put the leads in place and touch the 4th and 6th pins of the motor. Just like mentioned above, observe the multimeter for any beeping sound, illumination of lights, and displayed readings.

There's something wrong with the motor, if no sound, light, or readings from the multimeter when testing the 4th and 6th pins of the motor.
Final Thought
When you encounter problems with the motor of your 3D printer, it is important to use a multimeter to test its continuity. If necessary, it may need to be replaced with a new one. Moreover, in the regular maintenance of a 3D printer, you may also come across situations where the motor shaft is bent. This can result in Z-wobble and Z-banding, particularly on the Z-axis. In 3D printing, hardware issues are common and it is necessary for us to acquire relevant knowledge in order to troubleshoot them.