If you're struggling with obvious scars on your printed objects, consider taking a look at this article for assistance. Typically, unlike the regular patterns of 3D print ringing, these lines often appear irregularly on the top surface of the print. Especially for models with large and flat surfaces, these marks can undeniably have a negative impact on the part's overall appearance, which can be frustrating. You can calibrate the printer and adjust slicing settings to smooth the top layer of printed parts; Cura contains many useful features such as combing mode, Z hopping, and ironing tool. Let's continue to read and find the causes and methods to solve the issue: Line scars and scratches on the top surface of 3D prints.
What Causes Scars or Scratches on Top Layer of 3D Prints

(Image source: Anycubic official user group)
Scars or scratches appear as irregular lines on the surface of a 3D print, which are a visual defect. However, it is not an irreversible problem; these marks can be sanded down to achieve a smooth surface. It is best to take measures to prevent it from happening again, and you should understand the causes behind this issue first. The following three points are its causes.
- Extruder is extruding too much.
- Nozzle is hitting the surface of the printed object.
- Print settings in the slicer are wrong.
How to Stop Top Scars of 3D Prints
Solution 1: Calibrate Your Printer
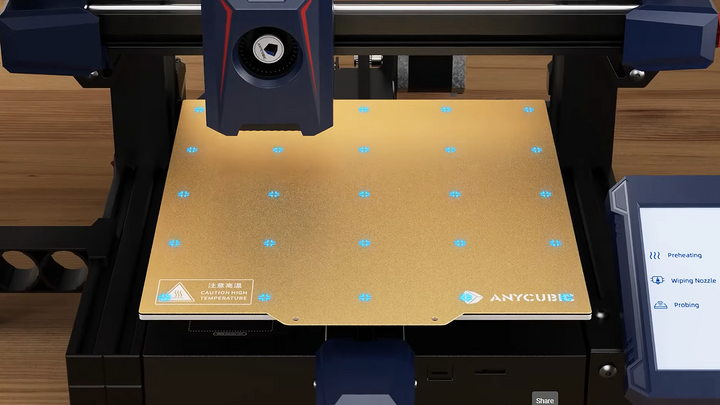
(Anycubic Kobra 2 LeviQ 2.0 Automatic Leveling System)
Even a slight unevenness in the heated bed can lead to inconsistent distances between the nozzle and every point on the bed. In such cases, friction against the print surface can occur when the nozzle moves, resulting in scars. A level bed is often crucial for successful printing. If you're new to FDM printing, it's recommended to opt for an automated leveling printer like Anycubic Kobra 2 or Anycubic Kobra 2 Pro. Manual bed leveling can be intricate, requiring skill and experience, and is prone to calibration errors that can lead to print failures. With an automatic leveling machine, you often only need to press a button on its screen, and the printer will perform the leveling process automatically. Moreover, Kobra 2 not only offers fast printing speeds of up to 300mm/s but also features smart Z-offset, making it extremely beginner-friendly.
Solution 2: Lower the Print Temperature

(Image source: Anycubic official user group)
If the extruded filament from the nozzle exceeds the expected amount, it can result in excess plastic residue that will form scars on the surface of the print. This may occur due to the hotend temperature. In this case, just imagine, each time the nozzle finishes a layer and travels to the starting point of the next layer, a small amount of liquid filament will uncontrollably ooze from the nozzle.
To reduce marks on the top layer of the print, lowering the print temperature can reduce material flow. However, different materials have their own temperature requirements. If you want to achieve the optimal printing temperature, it's necessary to refer to the recommended temperature provided by the material manufacturer. Otherwise, setting the temperature too high can lead to stringing and over-extrusion issues, while being too low may result in filament grinding and under-extrusion.
Solution 3: Adjust Flow Rate
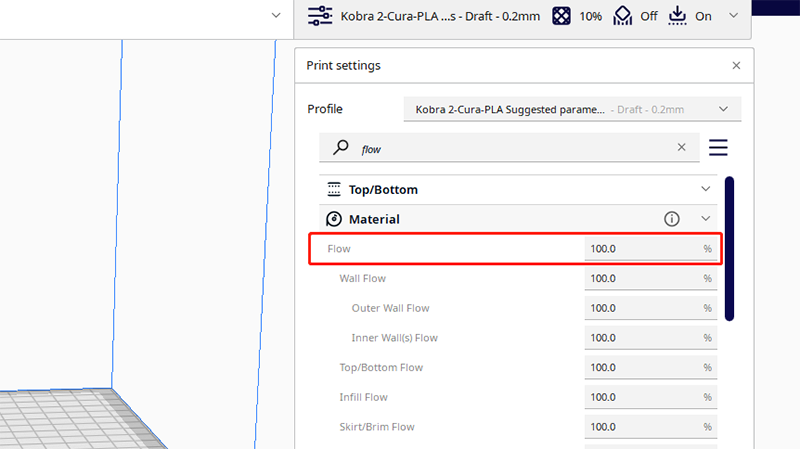
(Flow rate settings in Cura)
The flow rate (also called extrusion multiplier) has an impact on your 3D prints. This parameter can be found in the slicer software and determines the amount of filament extruded during printing. An incorrect flow rate setting can lead to various issues, such as 3D print zits, and inappropriate extrusion.
To calibrate the flow rate, you can begin by testing a few models with a 5% variation based on the default value. In Cura, its default value is set at 100%. In most cases, the optimal flow rate for PLA filament is 100%.
Solution 4: Activate Combing Mode in Slicer

(Dark blue lines are the travels of the nozzle when combing mode enabled in Cura)
You can find the "Combing Mode" feature in the Cura slicer. It is designed to prevent stringing and oozing issue from the hotend, and this issue can lead to marks on the surface of the print. After each layer is printed, the print head travels from the endpoint of the finished layer to the next point, and the combing mode can control these travel moves.
The "All" option is often set as the default setting for combing mode, which means the nozzle stays within the print during travel moves. But this mode still moves over the top and bottom of the print, and leaves scars on the skin. It is recommended to choose the "Not in Skin" mode, which it's best to 3D prints with a large and flat top surface. In this way, the nozzle moves inside the print but avoids traveling over the top and bottom, significantly reducing scratch lines on the top layer of the prints.
Solution 5: Enable Z Hop in Slicer

(Image source: Ultimaker)
If you've already leveled the print bed and fine-tuned your print settings, yet scars and marks still appear on the top of your part. You can try enabling the Z hop feature in the slicer that could provide a solution. When Z hopping is activated in Cura, the nozzle is slightly lifted during travel moves to avoid the print surface being scarred. You should know that using Z hop will slow down the 3D printing speed since the Z-axis is raised with each retraction.