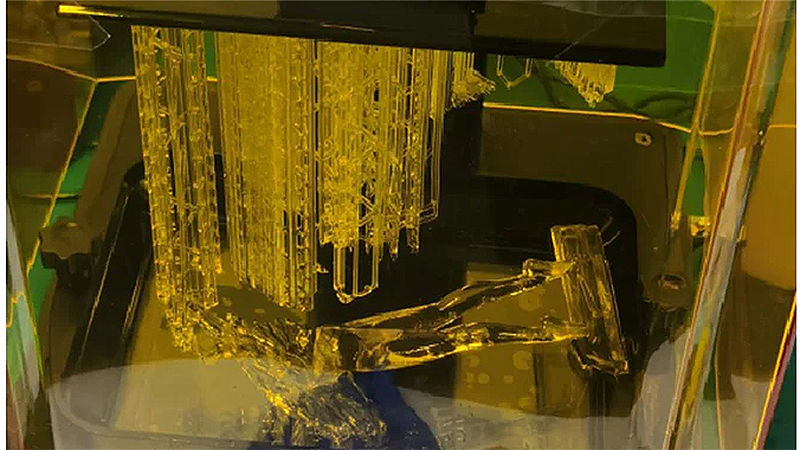
In resin 3D printing, as each new layer is printed, the build plate slightly rises, and the model is peeled off from the FEP film. During this process, a force is generated in the separation, which can lead to problems like the supports not connecting to the model. This may be due to improper printing settings or changes in the resin's properties. This article mainly focuses on how to fix resin 3D print support separation.
Causes for Resin 3D Print Support Separation
The causes of your resin 3D print separating from the supports are attributed to incorrect print settings in the slicer, including a fast Z lift speed, low exposure time, and a weak support structure. During printing, an unclean resin vat and a low-temperature printing environment can also contribute to your model not adhering properly to the supports.
- 3D print is too big and heavy.
- Support structure is not strong enough.
- Exposure time is insufficient.
- Z-axis lifting speed is too fast.
- Uncured resin and printer vat get dirty.
- Temperature of the printing environment is too low.
8 Solutions for Resin 3D Print Support Separation
1. Evenly generating enough supports in slicer.
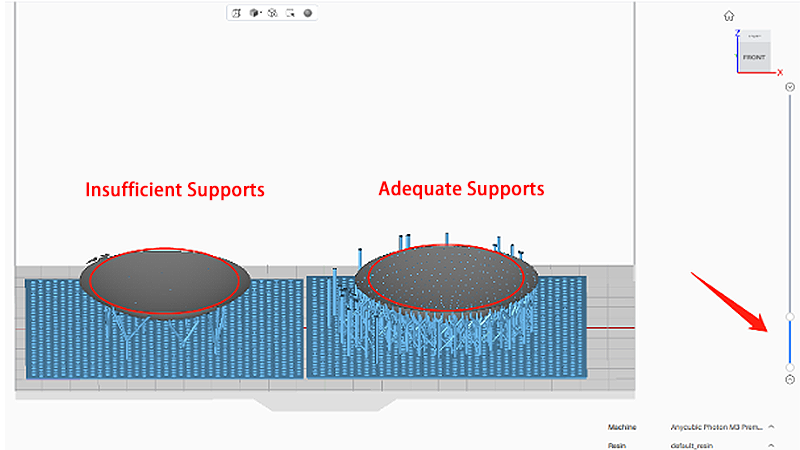
Supports in resin 3D printing serve to provide stability and prevent deformation and separation of the printed objects. Therefore, it is essential to generate an adequate number of supports for the resin print, particularly at its lowest points on the bottom. Equally important is evenly adding supports to the model in slicer, taking into account its shape. For example, uneven density supports in a model, where some areas have more supports while others have fewer, can lead to an imbalanced stress distribution and contribute to support separation issues.
2. Running island detector in slicer.
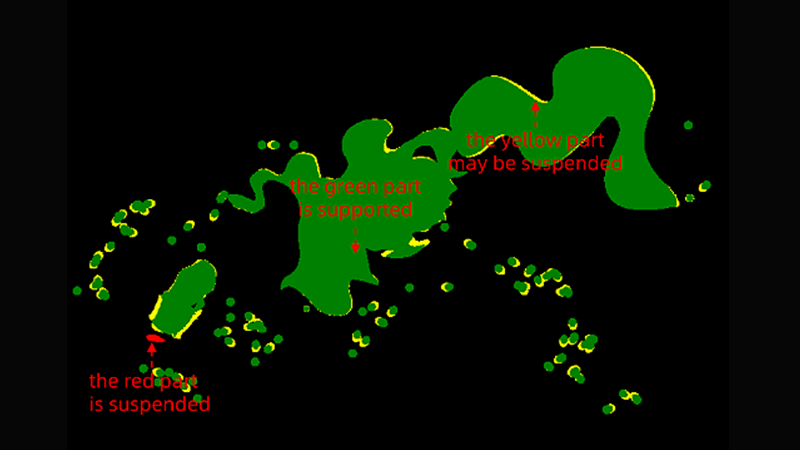
Island detection is a feature in the resin slicer that identifies disconnected or overhanging areas of the model to detect if they are properly supported, ensuring successful printing. Taking Anycubic Photon Workshop V3.0 as an example, you can enable "Check Islands" in the preview mode. By dragging the progress bar on the right side of the slicer interface, you can check the status of each sliced layer.
As shown in the image above, when you run the detector, it will reveal the green areas, indicating that no additional supports are necessary. The yellow areas indicate interconnected supports with overhangs, which may require additional supports to strengthen the structure. The red areas mean overhangs that need to be supported.
3. Improving the connection between supports and the model.
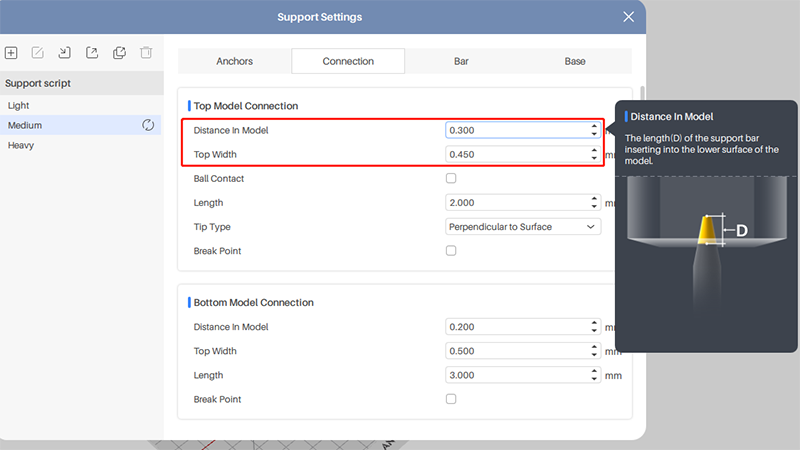
Strengthening the support structure can reduce the chance of the model detaching from the supports. You can adjust the contact points by increasing the support insertion distance into the model and the top width of the supports. In this way, the supports can firmly hold onto the model and prevent it from separating.
In Anycubic Photon Workshop V3.0, you are able to adjust two settings related to support parameters: "Distance In Model" and "Top Width." The former parameter refers to the length of the support bar inserted into the lower surface of the model, while the latter means the width of the contact point that touches the lower surface of the model. However, you should note that if these two values are set too large, it may result in difficulties during post-processing, such as challenging support removal and noticeable support marks on the model after removing the supports.
Following the path to fine-tune the settings for support connection: Anycubic Photon Workshop V3.0 >> Support >> More Settings >> Connection >> Top Model Connection.
4. Hollowing and punching holes to reduce the model's weight.
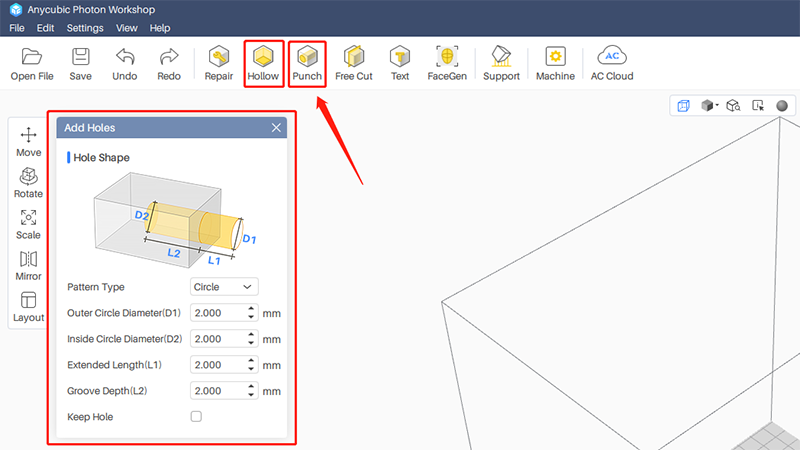
Hollowing out the model can not only significantly reduce the weight of the model to avoid 3D print collapse during printing, but also save your material and shorten printing time. When the infill density is too high or too low, it can lead to 3D print cracking. So it is recommended to hollow out the model and set a wall thickness of 1-1.5mm. Additionally, creating holes on the surface is crucial to prevent cracks on the hollow object, as it improves ventilation and allows for the drainage of uncured resin.
5. Increasing resin exposure time.

Exposure time is a common parameter in resin 3D printing, which refers to the time the uncured resin at the bottom of the vat is exposed to UV light. If the exposure time is too short, it can result in incomplete curing of the model, which might be the reason for the model not sticking to supports. However, excessive exposure time can also lead to model deformation. Calibrating the exposure time is necessary whenever changing different resins. Therefore, Anycubic offers a gcode test file called "Anycubic Resin Exposure Range Finder" for each of their printers. This helps users find the optimal exposure time values to improve printing success rates. Alternatively, try increasing the exposure time by 0.5-1 second and see if the issue is resolved.
6. Slowing down your printer’s Z lift speed.

Z lift speed is one of the key printing parameters in resin 3D printing. It refers to the speed at which the build plate rises from the resin vat after each layer is printed. A higher lift speed can result in increased peel force between the printed object and the FEP film, leading to support separation from the model. Try to slow down the Z lift speed to decrease the force and separation. But the speed is too slow that will increase printing time. Generally, a Z lifting speed within the range of 60-150 mm/min is appropriate.
7. Cleaning your FEP film and filter resin.

If there is dust or debris on your FEP film and resin, it can prevent full curing of the model and result in 3d print falling. It is essential to ensure that your FEP film, printer vat, and uncured resin are clean to avoid damaging the fragile FEP film. Because any sharp solidified resin can puncture the film, causing resin leakage. Especially after each print failure, cleaning is crucial. The first step before cleaning the vat is to filter the resin and remove impurities. You can use a cleaning kit or print a resin filter. What's more, there is an article on How to Properly Clean Your Resin Vat & FEP Film, which provides two methods of cleaning: quick cleaning and deep cleaning.
8. Maintaining the optimal temperature in the printing environment.
The printing environmental temperature is easily over-neglected by many beginners in resin 3D printing, and it can affect the results of resin prints. If you are printing during cold months in the high-latitudes, you may frequently encounter printing failures such as print detachment. The optimal printing environment temperature is around 25-30℃. When your room temperature is only 15-20℃, it is recommended to increase the exposure time by 30% from the default setting while reducing the Z lifting speed by 30%. If resin preheating is needed due to low temperature, using tools such as an air heater or hair dryer, ensure that the resin does not over 60℃. Additionally, it is also important to store the UV resin within a temperature range of 18-35℃ to prevent resin degradation and printing failures.
Final Thought
The separation of the support from the model is a common printing issue in SLA 3D printing. By understanding the causes of the issue, it can be solved through the slicer by adjusting resin print parameters, strengthening support structures, and hollowing out the model to reduce weight. Just as important is regular cleaning of your FEP film and resin, as well as keeping an appropriate printing temperature.