We had simply introduced how to add supports to 3D prints in a slicer - Anycubic Photon Workshop which is designed for Anycubic's Photon Series resin 3D printers. Today, we'll explore how different support tip settings, such as contact shape and break point features, affect printing success and post-processing. We performed some comparative tests and drew conclusions in the hope of making their differences more apparent to you. It's important to note that this article is based on version 3.0 of Anycubic Photon Workshop, which you can download or upgrade from the official website.
3D Printing Supports - Contact Shapes
Settings path

In the Photon Workshop slicer, support contact shapes are divided into 'Default Contact' and 'Ball Contact'. You can find 'Support' in the top toolbar, then go to 'Support'>>'More Settings'>>'Connection'>>'Ball Contact'. If you don't check the option of 'Ball Contact', the system will automatically set it to 'Default Contact'.
Introduction of contact shapes

Default contact shape: After removing the supports, tiny holes may easily appear on the part's surface, and the larger the values for 'Top Width' and 'Distance in Model' (contact depth), the larger the holes and marks on the print. You may need to use 3D print fillers for a smooth finish.
Ball contact shape: Support removal leaves visible raised marks or bumps, which can be smoothed by simply sanding. However, ball contact supports may still leave behind a few divots or craters on the print. You can check every layer of the model through the draggable slider on the right side of the slicer interface. If you find that some support tips do not make ball contact with the model surface, reducing the 'Top Width' or increasing the 'Ball Diameter' can help.
Note: Greatly reducing the 'Top Width' may result in a weak support structure, and the model falls off the buildplate. Increasing the 'Ball Diameter' will result in bigger bumps on the print surface, which require more time for smoothing.
3D Printing Supports - Break Point
Settings path
'Support' >> 'More Settings' >> 'Connection' >> 'Break Point'
Introduction of break point

Anycubic Photon Workshop 3.0 software introduces a new feature - 'Break Point', which allows you to set break points on the contact points of the supports. This is designed to facilitate the post-processing of the model.
- Break Point Height: The length of the break-point
- Break Point Width: The width of the break-point
- End Height: The length from the top model contact point to the point over the break-point height.
- Start Height: The length from the point under the break-point height to the support bottom.
Comparison of Light, Medium, and Heavy Support with Different Contact Shapes
The most obvious difference between the three types of supports - light, medium, and heavy - is that stronger supports can better hold the model, improving the success rate of the print. However, these supports often result in more noticeable holes or bumps on the surface after removing them, making post-processing more challenging. The following is a comparison of tests for supports of different strengths and contact shapes. Let's see how these differences affect post-processing.
Test results for default contact
- Ease of support removal: Light > Medium > Heavy
- Difficulty of sanding: Heavy > Medium > Light
- Surface quality after sanding: Light > Medium > Heavy
- Print success rate: Heavy > Medium > Light


Test results for ball contact
- Support removal ease: Light > Medium > Heavy
- Sanding difficulty: Light > Medium > Heavy
- Surface quality after sanding: Light > Medium > Heavy
- Print success rate: Heavy > Medium > Light


Comparison of Break Point with Different Contact Shapes
With a ball model as an example, we will configure different contact shapes and break point settings, and then perform test prints to observe the results after printing, removing supports, and sanding.
1. Default contact, no break point:

2. Default contact, with break point:

3. Ball contact, no break point:

4. Ball contact, with break point:
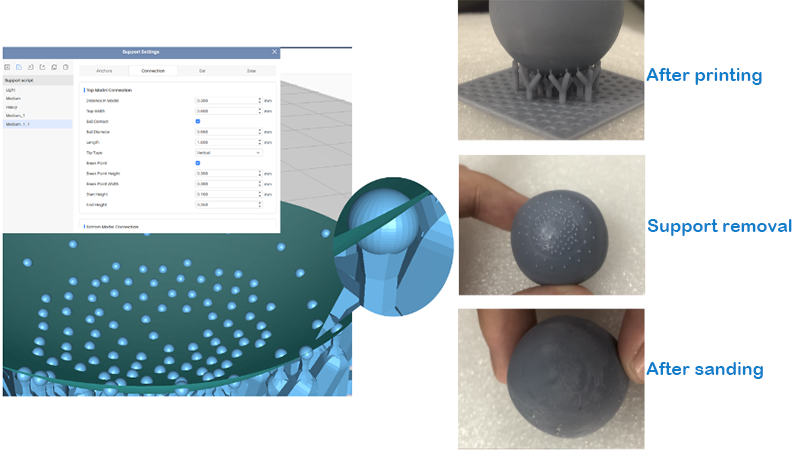
5. Test results:
- Support removal ease: Enabled 'Break Point' > Disabled 'Break Point'
- Support sanding ease: 'Ball Contact'+ 'Break Point' > 'Default Contact' + 'Break Point' > 'Ball Contact'> 'Default Contact '
- Surface quality after sanding: 'Ball Contact'+ 'Break Point' > 'Default Contact'+ 'Break Point' > 'Ball Contact' > 'Default Contact'
- Print success rate: Disabled 'Break Point' > 'Default Contact' + 'Break Point' > Ball Contact + 'Break Point'
Note:
- If the model is heavy and large, activating the 'Break Point' feature might result in printing failure.
- If you do not require a high-quality surface finish on the model or do not intend to perform post-processing like sanding, you can put in smaller values for 'Top Width' and 'Distance in Model' to set the default contact shape for supports.
- If you do require a fine surface finish on the model and easy post-processing, you can select the ball contact and enter appropriate values for 'Ball Diameter,''Distance in Model', and 'Top Width', while enabling the 'Break Point'.