
The filament runout sensor is a component of 3D printers for detecting the filament status. When the filament runs out, the sensor will stop the printing process, saving filaments and reducing the possibility of print failures. Some Anycubic FDM 3D printers, such as Kobra 2, come with the filament runout sensor pre-installed, while others, like Kobra Neo, require users to purchase the sensor kit separately for an upgrade. This article will guide you on how to install the filament sensor kit onto the Anycubic Kobra Neo.
Tools You Need

- Filament sensor kit
- Allen keys
- Wrench
The filament runout sensor for Kobra Neo is accessible on the Anycubic official website.
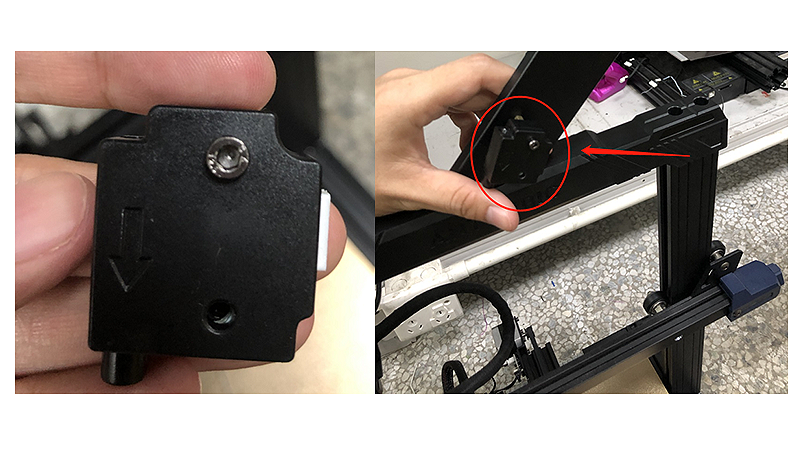
Step 1

Before installing the sensor for your printer, you need to remove the filament from the machine. Use a wrench to fix the hexagonal copper spacer on the hole of the filament rack located on the top of the printer's metal frame.
Step 2
Install the filament sensor onto the hexagonal copper spacer.
Step 3

Peel off the adhesive backing of the cable clips and stick them onto the printer. Start by fixing three cable clips on the backside of the right Z-axis frame. Then, place another cable clip on the bottom base, specifically near the machine nameplate, to ensure that the wires will not interfere with the movement of the heated bed during printing.
Step 4

Insert one end of the wire connector into the sensor mounted on the bracket. Guide the wire towards the back of the printer frame, avoiding any obstruction to the movement of the print head.
Step 5

This step is to secure the wire onto the attached cable clips, from the sensor to the printer base. It is important to note that for the cable clip on the bottom right corner of the printer's Z-axis, the wire should be wrapped around it to prevent the wire from being pulled by the heated bed.
Step 6

Use an M2.5 hex key to loosen the four screws on the bottom plate of the machine and then remove the bottom cover. Insert the other end of the green connector wire into the green port on the motherboard.
Step 7

The bottom of the Kobra Neo has reserved holes for the wire to pass through.
Step 8

Once you have ensured that the sensor wire's two connectors are plugged into their corresponding ports, go to the next step. Install the machine's bottom cover, which is secured by four screws. You should note that there are two long screws and two short screws that need to be properly fixed.
Step 9

The final step is to load the filament through the hole of the sensor, and then feed extruder.